

"From my house..." Fold Open Card Tutorial
I get quite a few requests for tutorials for the work I create - especially the design team member pieces that are specifically for Alpha Stamps using the products available for them. I've rarely attempted it for two reasons. First, frankly, I never remember to photograph each stage of the construction...so there's no record of how or when I did what. And, secondly, and most importantly, because each piece is an original, I'm flying my the seat of my extremely wide pants and don't really don't know what direction I'm going in until I've already gone there.
With that excuse out of the way, I knew it was time to honor some of those requests, and I purposely made a project with this month's wonderful collection of products in the design kit which I could do a tutorial from!

We start with a sheet of Provincial Hedge Scrapbook paper. It is 12" x 12" - but we're going to take care of THAT. We want the 'hedge' side to be the outside of our card; it will serve as both background and ground for the houses to sit in. The clocks will be the interior of the card. Trim one side of the paper to 11". Score and fold the paper into quarters - the 11" side will go across the top of your scorer.
Now, cut and remove the bottom left corner. I suggest using a paper trimmer to get a good straight line (unless you've an excellent eye for cutting a straight line!) DO NOT throw away the corner you've cut out - we'll use it later. Trim the bottom right corner to 8 1/2".
Now score the upper half (the 11" side) at 5 1/2" and fold in half with the foliage on the outside.
We're going to do a lot of scoring now to prepare the base of the card. Take the piece we cut off the bottom right and score: 1/2" + 1/2" + 1/8" + 3/4" + 3/4" + 1/8" + 1 3/8" + 1/4". NOTE: These are accumulative figures; in other words, first score 1/2" then go to the next 1/2" and score then go to the next 1/8" and score, etc.

Butt the final 1/4" score edge to the edge of the 8 1/2" trimmed side of the card. Tape flush together. I used double stick tape without removing the top layer of paper from the tape. Don't worry about the appearance - you won't see the join - but it should fit FLUSH against the edge of the page.

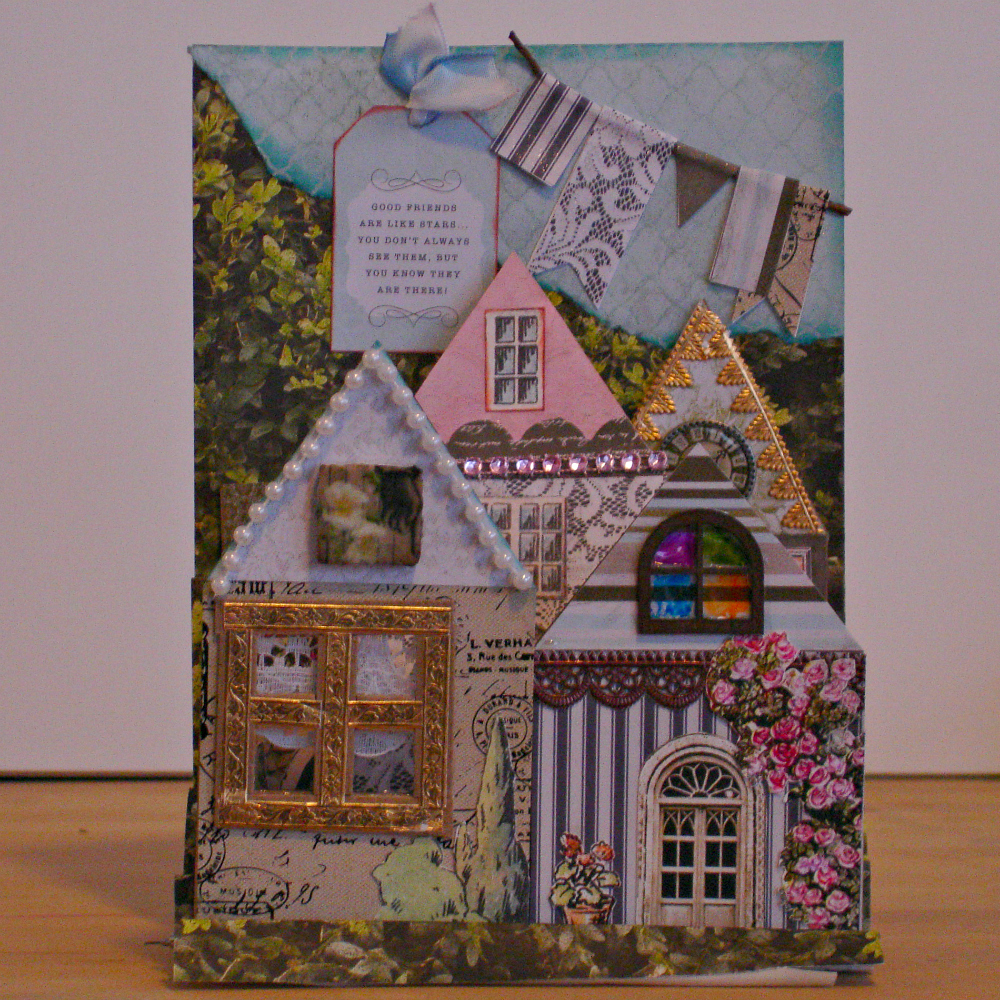
 On the first row I used the Decorative Window Set; the four pane square one I covered with gold Dresden paper trim and the arched four panel one I backed with acetate I colored with alcohol ink. All the papers on these houses (and all the houses on the card) came from the "Provincial" 6 1/2" Paper Pad. The trim on the shorter house is bronze/brown Dresden scrap and the faux beading is half bead plastic trim from Alpha Stamps, as well. In the supply list I will include all the names of the collage sheets used for trees, roses, door, etc. The small printed tile is from my stash.


 This will give you an idea of what will happen if you try to rush the drying process ... I wanted to get the photos taken for this posting and I didn't wait for the E6000 to thoroughly cure. I had to stick a few markers and pens under the middle section to hold it open LOL. I can't emphasize enough - give it time to dry!

Looking at the card from the back.
Now fold your scores into 'mountains and valleys.' To give you a mental image of what you're creating, every one of the 1/8" flat plateaus is where we will affix our decorated chipboard houses.
If you would like to create a 'sky' as I did, take a piece of blue scrapbooking paper (cardstock is not necessary) and cut to 2 1/2" x 5 1/2" (I think the Amour Violets are Blue paper from the Amour paper pad at Alpha Stamps is perfect - but any subtle pattern blue paper will do. Now tear from bottom right to top left of the blue paper leavening an uneven or jagged edge. Using blue chalk ink (or any dusty blue ink), edge the paper, then glue to the top right square of the card.
Now we start the really fun stuff - decorating our houses! There are several designs to choose from; pick your five favorites, you'll want some shorter ones for the front, a skinny one for the middle, and two taller ones for the back.

Now glue with strong adhesive, your houses into the first 1/8" plateau in your folds. You may want to clamp (or paper clip the sides of the 'mountains' to the houses to ensure a snug and secure fit.

I used the bling-on-a-string rhinestones and colored them with pink alcohol ink. The doorknob is a single flat back pearl (I think it's on the wrong side of the door, haha, but that's where the doorknob was printed on the house!). Everything else, the rock wall, the topiary, the urn with flowers, the windows, the door - are all cut from collage sheets.
Using the same process, glue this house to the CENTER of the second 1/8" plateau. Again, I recommend using binder clamps or paper clips or something make sure that house stays down snugly in it's resting space!

For the last row, I chose two house that were somewhat thinner so that I could have some space between them and not be completely covered by the middle house. I used gold Dresden scrap trim on the house roof on the right. A small gold bead is standing in for the doorknob. Both the red decoration and the balcony are diecuts I made on my Cricut. All the other elements, doors, windows, shrubs, etc. were cut from collage sheets. The key charm and clock charm are from my stash.
Using the same system, affix the two houses in the final 1/8 plateau.
To create the banner bunting, use a short piece of twine and cut various shape pennants from doubled over scraps left from making your houses. Fold them in half and glue them together with the twine at the top of the pennants. Glue the whole thing in place. You can see from the photo, I could have done a better job of trimming my twine closer to the edge of my card.
Make sure you've given your pieces a good length of time to dry ... it's sometimes hard to wait, I know, but I really do let them sit overnight. then unclip.
When you unclip your binder clips or paper clips, gently pull your houses forward. They should stand on their own.


If you would like, you could score-tape a piece of plain paper over the interior of the card (with the clocks) leaving a 1/4" border...which I only say because I think it looks nicest that way LOL.
Now you can write a note and send off your made-with-love-and-Alpha Stamps "From My House..." card.
Chances are, you won't have an envelope that will fit this card, so you'll have to either (a) make one on your envelope punch board - or, if you don't have a punch board, just use some sturdy white paper (butcher's paper is great!) and wrap your card like a gift, but on the diagonal ... it will look just like an envelope! You'll have to take this one to the post office to mail - it's over the 13oz. limit - and will require extra postage.
If you've made it this far, thanks for sticking around! I do hope you make some fun house cards for yourself to send to friends ... they're a delightful way to "connect" your home with friends, family and loved ones!
If you would like to see the supply list that was used from Alpha Stamps, just click here!
Now, go make something beautiful!
¸.•´¸.•*´¨) ¸.•*´¨)(¸.•´

(¸.•´♥ Tristan ♥


7 comments:
Fabulous! Your paper creations are amazing!
Beautiful cards. I would love to win this kit.
Dorothy Gaston - you need to sign up for the contest on the Alpha Stamps.com site - they are running the contest, not me.
The address is http://www.alphastamps.com/blog/?p=14861
Good Luck! ... and I'm glad you like my card!
Wow!
this is wonderful!
Good work Tristan! Funny Laural too! Sanna
A-Ma-zing!! Thanks so much for the tut, yes, i did stick around! heehee
You get all the credit in the world for even writing out all of those steps! This is truly beautiful!
Jackie ")
Post a Comment