Tuesday, June 21, 2016

Let Me Introduce Rob Heard ...

After his first job in a sheet metal factory left him somewhat cold and uninspired, Rob Heard headed into the woods of Somerset at just 18 years old, to get down to the macho business of tree-felling and a return to nature.

Rob has been a man of the woods ever since, averse to keyboard and pen, at one with chainsaw and chisel – living out a lifelong affinity with timber borne during a childhood where he accompanied his father, a crafter of cricket bats, on his forays to harvest willow.


Outdoor pirate ship playground
 
This career path gradually evolved into building timber playgrounds for children - where Rob became renowned for his trademark pirate ships. During the planning process of each playground project, he developed small-scale working models for his clients to illustrate how the finished play equipment would fit together. Rob found that these models were often ‘lost’ by his clients, whose children no doubt fell in love with these apparent 'toys' and squirreled them away to their bedrooms.
Indoor pirate ship playground

Unexpected inspiration followed when, after injuring his wrist, Rob was forced to stop lugging tree trunks and spent six months recovering from the surgery at home. During this time, he scaled down his focus and began to think big, yet in miniature, creating his first Bough House sculpture for his three young daughters. He has been creating these intricate yet robust pieces ever since.

My only limit is the height of my workshop ceiling and maybe that’s a blessing!”
 

“Once I start creating, I do not know where the structure will end.”  

The wooden sculptures take shape in a music-filled workshop at the bottom of Rob's garden. Each one can take up to four or five hundred hours to complete, including time spent just sitting and staring at the pieces, musing about how they are going to develop.

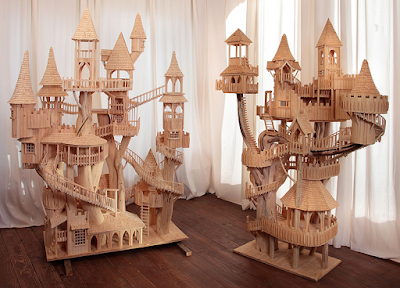
Inspiration usually starts with a bough of wood - cut from local trees or found lying in the fields close to Rob's home. The form follows the shape and twists of the branch, informing the design. There may be sketches, but no rigid plans and the Bough Houses develop from a sense of how Rob wants the journey within that sculpture to feel, or the way in which he would like one to be able to travel between different areas within the form.


The individual elements of the sculptures are hand cut or carved and fixed using pins and glue - right down to the last roof tile. Rob's attention to detail and meticulously accomplished workmanship mean that the structures are deceptively robust. They are not delicate, they are meant to be played with and are as strong as they are beautiful. 


In effect these are the real deal, not models, but real on a very unusual scale. Rob's children love to play with the Bough House that he built for them and the quality of workmanship has stood the test of time - but they are more than a physical thing - you can spend hours wandering the walkways and turrets and paths in your own mind. These are truly inspirational pieces of art. 

Each of Rob Heard's wooden Bough House sculptures takes several months to complete. Every intricate spiral staircase, walkway and ladder leads somewhere...inviting the imagination on a miniature exploration through an array of turrets and towers.

The sculptures can be over six feet tall and each one is completely unique, taking inspiration from the wood and the surrounding Somerset countryside.

 Follow Rob on Twitter to see how the latest sculpture is evolving.


Thanks for visiting Enchanted Revelries ... now go make something beautiful!

¸.•´¸.•*´¨) ¸.•*´¨)(¸.•´ 
(¸.•´♥ Tristan


Wednesday, June 1, 2016

Creating Miniature Shrines for ATC's (Artist Trading Cards) ...


When I first discovered ATC's (Artist Trading Cards) about 10-12 years ago, I jumped in head first and joined every swap I could find; the result being that I have hundreds of marvelous little works of art from some terrific artists and craft people. There has always been a question of what to do with them once you've got them! I had a couple of my favorites framed - but that gets expensive in no time flat - AND you can't have hundreds of little tiny frames on a wall; it looks like you have roaches - AND the frames don't really do them justice.

So this month when my design team kit arrived, I was excited to find these little ATC shrine boxes, especially designed to hold Artist Trading Cards (which are ALWAYS 2 1/2" x 3 1/2" - the only "rules!").

I chose a shrine kit to use:  ATC Shrine with Feet
Then I created an ATC to use in the shrine:

I used left over pieces from my Enchanted Forest Castle and Mini Album Project (here) paper pack and covered the shrine with pieces of paper after it was glued together. (Tip: I used rubber bands to hold the shrine square while the glue was drying - worked great!)
Then I used the Gold Leaf Adhesive Pen with Gold Leaf for the edges of the shrine, a piece of gold zig zag Dresden border inked with Mermaid alcohol ink, miniature blue rose buds, and pieces of the Leafy Corners chipboard set
I added Peacock Liquid Pearls and a Round Word Charm. All are from Alpha Stamps. I finished up with a crown die cut from my stash, cut a die cut chipboard frame in half from my stash (sprinkled with micro beads colored with alcohol ink from Alpha Stamps) and glued them to my finished piece.

Now I thought the ATC was properly showcased!

Just as I was getting started on the second piece, I got a phone call from a friend who wanted suggestions for her wedding's bridal party's place setting favors. I mentioned what she I was in the middle of doing right now and asked what her theme was...well, it seems that she's getting married at Christmastime and her theme is Enchanted Winter Wonderland. Sound pretty, huh?! I told her to give me two days, and I'd come up with an idea (I didn't mention I was also going to fulfill my design team obligation!).

First I had to create the base of the shrine: the ATC:
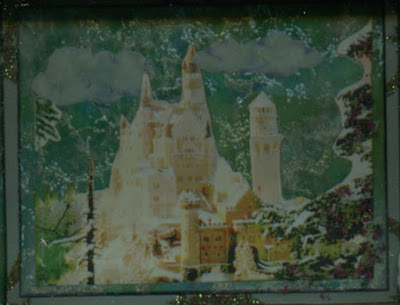
I used alcohol inks and embossing powders to create the background, used and image from the "Castles in the Air" collage sheet, and painted in the clouds myself. I decided it looked wintry enough. Hard to remember when it's 90 degrees outside!

Then I chose to use the shrine kit "ATC Shrine Box"

adding the "ATC Ivy Frame." I covered the leaves with 1mm micro beads, used platinum Liquid Pearls to outline all the straight edges and platinum Stickles for the three
decorative dots on the insert. It was getting more enchanted! I used the middle sized bottle brush tree from the Retro Bottle Brush Tree Set (shaving some of the back branches so it would fit totally into the box flush with the back...also Flower Soft was added to the tree image on the right side for texture. I also added a pair of wings from the Butterflies Decoupage Paper (I love this paper!) to a vintage plastic bride from my stash. I assembled all the various elements, added Silver Cups turned upside down to use as feet and ribbons and bead flowers and millinery flowers buds to the top to finish it up.
My friend was thrilled with it - and asked if I cold make 9 of them - and somehow turn them into placecards.

I'll let you know how that turns out LOL.

If you'd like to try these projects yourself, here is the complete Alpha Stamps supply list: just click here for all the materials and information on each.

Now...go make something beautiful!
¸.•´¸.•*´¨) ¸.•*´¨)(¸.•´ 
(¸.•´♥ Tristan