When Leslie from Alpha Stamps contacted me about doing a special project for the new Graphic 45 paper line "Midnight Masquerade," I jumped at the chance - I love the colors in this paper collection, and the nostalgic 1930's images appealed to my sense of nostalgia and romance. I also knew nothing could give me the permission to indulge my love of over-embellishment like a masquerade! I decided to make a series of photo/memory albums of different styles and sizes.
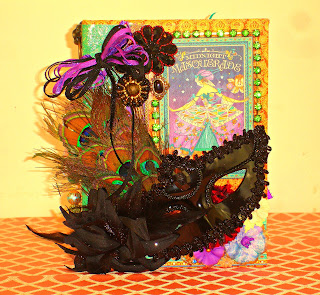
The first one, which ended up being the largest (9" x 11") I made from a basic chipboard base and covered with the beautiful Graphic 45 papers. I used a plain, inexpensive half mask from the dollar store and went to town decorating it. I also used lots of mulberry paper flowers, ribbon, Relics and Artifacts Rhinestone Chain, and Artchitectures Feathers from Alpha Stamps.
Like all the photos, if you would like to see a larger photo to see details, just click the photo and you'll get a larger image.
I loved the dangling chains and strands of elaborately decorated beads with charms and decorations that embellish the spine of the album. They all hang from the Alpha Stamps lion head door handle. (Just a tip, screws do not come with this door handle, but there is a threaded hole in the back. To ensure strength, I took my lion head door handle to the hardware shop and found the perfect screw to use to attach the piece to the spine. Even through the heavy weight chipboard, several layers of paper and the binding system, my Crop-O-Dile went through like it was warm butter!)
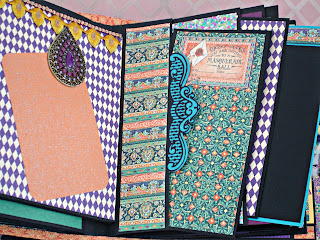
The first 'spread' utilizes a paper-lace embellished belly band which holds 5 or 6 photo mats that will accommodate 6" x 8" and small photos or mementos. It is embellished with Sun Large Metal Filigree ornament and a Simple Silver Mask Charm which I heat enameled with Iced Resin Enamels (I love the way the dark crystals make the charm look old and worn!) The other side is embellished with more paper flowers, a handmade butterfly of waxed paper, a vintage piece of jewelry from my stash and lots of carnival masquerade color beads, large and small! Alpha Stamps has over 200 wonderful choices of beads - shop to your heart's content!
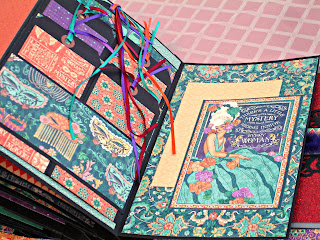
I had to go light on the embellishment and decoration on this next spread. I knew I was going to be taking up valuable 'real estate' room when I chose to turn the right side page into hidden 'door' behind which were stored five photo/journaling/memory tags. I loved the surprised of finding new places to display mementos, which you can see in the photo below!
I owe a debt of thanks to Kathy Orta King from Paper Phenomenon for designing two fabulous ideas that I use all the time now that I've discovered them. The first is the 'faux' storage envelope. So many albums use envelopes to store loose photos and mementos, and I find they get just get forgotten about - and add bulky bulges to your album. Kathy created this terrific idea of making a page that looks like an envelope, but really isn't! As you can see in the photo below, when you open the flap, it's really another flip/fold, and hiding inside are more photo mats and a large mat that can be left as it or used for up to a 7"x9" photo! Such a clever and attractive idea! Again, I kept the embellishments to a minimum to save space. Though on the envelope flap, I did create a masquerade couple in a bezel layered under Ice Resin and finished with a gold tassel that I'm quite fond of ... also lots more paper flowers
While I'm thanking Kathy at Paper Phenomenon I also want to thank her for pointing out to me the way people have changed taking photos in the past couple of years. For quite awhile, everybody was taking photos with their digital cameras, so most of their photos were landscape orientation (wide and short) and we needed photo mats that would accommodate photos in that proportion. Now, however, more people are taking photos with their phones, which means their photos are portrait orientation (narrow and tall), so there are more photo mats required in that style. I use a combination of both - and, of course, photos can be cropped to any size you like anyway. But I thought it was a great piece of insight!
I really like this pocket. It's extra deep and, though I have five photo mats in it, it will handle more with ease and not cause the book to bulge. The pocket itself is a 'fussy cut' (I hate that term - I always feel like I should be wearing a lace granny cap and half spectacles) image from one of the paper collection signature images. Also!, notice that gorgeous piece of purple glimmer paper on the little photo pamphlet I made in the front - isn't that color so luscious you want to eat it!
The center spread is a double image of the same page. It's a paper lace decorated pocked, embellished with Arts and Relics Rhinestones Chain, Brass Mask with Scalloped Edge, more paper flowers, and silk screened feathers and some old jewelry from my stash.
A simple spread with a large silk flower from my stash which will enhance any photo placed on that page (it is only affixed in the upper left corner, so the photo will slide under the bottom right of the flower.) The other side has two portrait style photo mats, which are reversible, as seen below.
This large page will hold up to a 7" x 9" photo. The corners are trimmed in bronze filigree corner ornaments.
I love this left page with its vintage ornate faux jewels, sparkly paper and elaborate stunning imported embroidery trim. The jewelry is only adhered at the top, so a photo will easily slide under the bottom edge of the metal to embellish the photo. The right side page has an ornately die cut pocket which will hold a large photo mat, and there is a pocket which holds two (or more) photo mats behind it.
I decided it was time for another 'faux' envelope, and this time faced it with two landscape-style mats. The flap is, again, embellished with lots of papers flowers and some decorations that I created from some bits and bobs from my stash.
Inside the envelope, again, are hidden photo tags, this time larger, trimmed in Gold Stickles, and a bit more ornately shaped ... they make me smile because they remind me of the shape of the lady's hair!
This spread features a large space for a photo layout, one large photo, a memento, or favorite poem. The facing page has a three page portrait-style 'waterfall' page which will accommodate up to six photos. The ornamentation is a chipboard piece from the paper collection, more paper roses, Prills micro-mini-beads, and a vintage piece of jewelry from my stash.
Here are two landscape-style mats facing my favorite image from the portrait collection. I embellished the masquerade lovers with another waxed paper butterfly, some ribbon, lots of flowers, peacock feathers, feathers, miniature hyacinth and a crystal brooch from my stash. Tip: The orange roses at Alpha Stamps are the only ones I could find anywhere that came close to coordinating with this paper line!!! And, to beat that, they also have the most adorable teensy tiny orange rose buds that match them!
More space for photos - notice that stunning reproduction Antique Bronze Fan Charm on the left page - charming! All of the text images are from the paper collection sticker sheet.
The final page spread is another 'faux envelope, facing a back page with a belly band, decorated with a paper collection chipboard embellishment, feathers and flowers. It holds a red glittered festive photo mat - and there is room for lots more! The flap on the envelope is decorated with lots of flowers that have been 'glitzed' up using liquid gold leaf on the edges.
Inside the envelope are more 'hiding' photo tags - this time a page of six - and a facing page that will hold up to a 6" x 8" photo - or embellish your album just as it is - she is pretty spiffy, isn't she?!
Before I started my next project, I took a little tour of my album and took some shots of my favorite embellishments and decorations and mini-collages...
I decided to create a small staggered wallet / brag book / pocket folio / something-or-other that would be cool. By staggered, I knew that I wanted the pages to be all different heights and widths. I gave myself a challenge - of course, only I would know if I actually followed it - but I did! I made the whole thing from one piece of paper! (Not including the decorative paper on top, of course.).
The one thing I hadn't planned on was the amount of space it was going to take up when I started stuffing this little booklet (it's only 4 1/2" x 7"!), so it required a beautiful piece of vintage wrinkly gold silk French ribbon to hold it closed. I think that was a happy mistake!
The front page is 3"x5" with a 4 1/2" x 4 1/2" overlay. On the panel I added a 3"x5" panel with a paper collection image layered under Ice Resin and surrounded with assorted beads in the festive colors of the paper collection. I added a white feather to which I glued some silver glitter, some of the paper collection cut-apart 'stamps' and a rhinestone embellishment. I added the tiniest flowers from Alpha Stamps. And finally, I add an ATC mask from the ATC Mask Set which I outlined with 3D relief paint, painted with fantasy paints, embellished with seed beads and a few flat back rhinestones, and added a few paper streamers.
The second and third pages are 3"x5" and 3 1/2" x 6" respectively. The second page has a thin tie of silk ribbon which will hold several business card sized photos or cards (or a little larger). I have four in it now, and it could still take three or four more. The third page is a pocket, which could hold photos, mementos, tickets, poems - ata the moment, I have two 'fancy' envelopes with enclosures and a plain white tag in it. It is is embellished with a chipboard images from the paper collection, ribbon, small flowers, and a delightful teeny tiny masquerade mask!
The fourth page is 6"x3 1/2" and the last page is 5"x7". I put two pairs of waterfall sets on the fourth page. As you can see in the photo directly under it, there are bands to hold photos in place under each 'page' of the water fall. The front of each waterfall is decorated with a rhinestone embellishment. The final page is a pock which holds several postcards, a tag, and a photo mat. It is embellished with another chipboard image from the paper collection. More flowers, some ribbon, and another one of those teeny tiny masquerade masks finish off the pocket.
Here is the entire 'album' standing open on its own. As it's made from 1 piece of paper, it's obviously 12" wide, though measures shorter when 'zig zagged' to stand on its own.
This is the back of the album. I covered with various papers from the paper collection, and think they'll make a terrific spot to showcase another grouping of photos!Well, I had a jolly good time with that one! So much fun, in fact, I decided to make another small and less elaborate album! Of course, 'less elaborate' from the Glitter King is not necessarily the same thing as 'less elaborate' from a more moderate artisan! 💫
This album is a simple 6"x6" album with no spine. The pages are created so that they actually act as a binding by themselves. Although, I personally prefer a spine and binding system, this is certainly a fast technique for a quick gift that won't take a week to make!
My front cover is one of the Midnight Masquerade papers and has been outlined with pearl and rhinestone rosary chain. An image from the paper collection has been inserted into a fanciful silver frame which I have embellished with clear rhinestones. I've also used white fabric flowers and various size beads. The finishing touch is the stunning Large Fancy Silver Mask Charm from Alpha Stamps. It's a beautifully detailed and almost 2" wide, not to mention, absurdly reasonably priced!
This album used one pieced of paper for each 'double' page spread - no cutting! Just fold, glue, and fill with your favorite photos, or mementos.
I have used some papers from my stash to coordinated with the Graphic 45 Midnight Masquerade paper collection. I wanted, of course, for the Masquerade papers to be the focal point - but I liked the idea of a few surprises here and there.
Each of these pages uses one of the chipboard images from the paper collection. There are also lots of paper flowers used that the links were given in the above album descriptions.
My final album for this series is a book which was designed based on the Graphic 45 Deep Rectangle Matchbox Book and the Graphic 45 Rectangle Tag and Pocket Album. I knew all the embellishment and decoration had to be on the outside of the rectangular box, and almost everything inside the box would have to be flat, as there was no extra "real estate" to allow expansion - if the album got much thicker than it already is, it simply wouldn't fit back into it's matchbox book. So, this was challenging - and a lot of fun!
I started the Matchbox by painting all the corners with Lumiere Metallic Acrylic Paint - True Gold - oh, I love this paint! I then covered the top with rhinestone mesh so that the entire surface was a sea of sparkle! Sweeper Fringe was then run around the window opening of the box. Check out the different color combinations available - gorgeous! I used some silver glitter on white feathers and filled a 2 Inch Glass Bottle with seed beads and specialty beads in the same colors as the paper collection. A lot of paper flowers were used and really help to give an extravagant vision. Finally, I used an ATC mask from the Mask Set - ATC Size, outlined the basic areas and free-handed a few decorative spots with gold Cerne Relief, painted with two colors of Fantasy and Moon paints and installed a metal filigree ball.
When the box is slid open, the bottom stores a 7"x9"x3 1/2" photo album
I used various elements from the different designs from the paper collection to create a small collage-like cover. As previously mentioned, everything had to be flat, so that no depth was created.
These are the photos of each of the pages. They are all constructed the same way (the album is already constructed. Every other page has a pocket and in one pocket there is a white tag. I chose not to add any paper to the tag, so that any additional depth would be made with photos installed in the album. I chose to use a black tag on the opposite side of the page, which had been left empty by the company,I have used some flowers for decoration, but all very flat, and not adding depth.
Thanks for spending time with me and my Midnight Masquerade! If you'd like to create your own Midnight Masquerade album (or other of the fab crafty arts projects that have been presented by the design team this week!), here is my supply list. Hope you have a great artisan day!
Now go make something beautiful!
¸.•´¸.•*´¨) ¸.•*´¨)(¸.•´
(¸.•´♥ Tristan ♥
ALPHA STAMP SUPPLY LIST
Midnight Masquerade 12"x12" Pad
Midnight Masquerade Patterns and Solids 12"x12" Pad
Midnight Masquerade 8"x8" Pad
Midnight Masquerade Journaling Tags
Midnight Masquerade Cardstock Tags and Pockets
Midnight Masquerade Decorative Chipboard
Midnight Masquerade Ephemera Cards
Deep Rectangle Matchbox Box
Rectangle Tag and Pocket Album
Relics and Artifacts Rhinestone Chain
Architecture Feathers
Ribbons (approximately 12 different styles)
Paper Flowers (approximately 18 different styles)
Lion Head Door Handle
Simple Silver Mask Charm
Sun Large Metal Filigree
Beads (various selections - pick and choose)
Gold Stickles
Antique Bronze Fan Charm
ATC Mask Set
Small Silver Mask Charm with Dots
Large Fancy Silver Mask Charm
Lumiere Acrylic Paint - True Gold
Sweeper Fringe
2" Glass Bottle
~Please Note: I did not include anything vintage or from my personal crafting stash in the supply list~
"Have you seen those fabulous craftsy goodnesses over at Alpha Stamps?!"















10 comments:
Congratulations,Tristan, on a beautiful job showcasing Graphic 45 papers. Just love the bright colors and designs. I think the album with the white tags is my favorite, although it was hard to choose.
Gorgeous! I am completely overwhelmed with gorgeous! Tristan the albums are beautiful. And that idea for a faux envelope! Fantastic!
Beautiful work, Tristan. I love it all. May I ask you a question? When you do a pocket that spans the page, do you cut a separate piece of paper or do you cut the pocket in one piece and fold it. Also, how do you glue or adhere the short piece to the long piece. I don't think I have been attaching my pockets correctly. Thanks for any help and for giving us this eye candy on Easter. :)
Thank you Ronda for your kind comments.
There are several different style pockets used in these four albums, so I'm not sure which one you're referring to in your post.
The most common one I use is a separate piece of paper is cut 1" wider than the background paper and the actual height of the desired pocket.
I score tape (usually using 3/8" score tape) the BOTTOM of the pocket to the background. Then wrap 1/2" around the background paper with the pocket excess paper and score tape it down on the back. Then the entire pocket assembly is score taped to the base base. Tip: when taping the flaps on the sides of the pockets to the backing, stick something shallow (I use a roll of 1/4" score tape lol) in the pocket. That way it won't be so tight you won't be able to get picture mats or ephemera in the pocket.
Hope that helped!
Thanks so much, Tristan. This helped me greatly. :)
Oh my, Tristan, these albums are each a masterpiece in and of themselves. The paper colors are beautiful, but it takes real talent and creativity to put them together in such a way as to look even more beautiful, and you have accomplished this, as always. Oh, and thanks for the advice about the orientation of photos and the mats that might be used in our albums. I will surely keep that in mind for my next album. You are amazing and I can see you have been very busy. LOL Hugs, Barbara
Tristan!!
WOW WOW WOW AND WOW!!!!
These albums are absolutely exquisite!!
Each of these have so many charming and glorious details! I poured over and over the photos, just amazed at your creativity and artwork!!
Has Graphic 45 seen what you have created?? You should be highlighted on their cover! And Leslie @ Alpha Stamps knew exactly who to choose when it came to using these new products! Superb work on each book- they are treasures for sure!
Have to tell you I giggled aloud at your thoughts on Fussy cutting- haahaa My challenge to you, is to come up with a new name in place of, and i will be sure to use that from here out and credit you with it's origin! LOL
thank you so much for these Gorgeous shares!!
Jackie xx
Beautiful work Tristan. Love how you take a line of paper and make something magical with it. Everything you made is magical.
Darn it Tristan! I always check out your posts as soon as I see them. Of course, that is when I am on my phone and too lazy/clumsy to leave a comment. Then I forget....Eventually I remember though, and that is why I am here. These books are simply stunning. You do such gorgeous work. I am also happy that you go to guest design for Alpha Stamps again. Bravo!
Haha. I was more "with it" than I thought! I did leave a comment earlier! Silly me.
Post a Comment