

"Artist Hands" oil painting Thomas Saliot
The bad news is we haven't had theatre tickets to anything in a couple of weeks. The good news is that means I've had time to get into the studio and play and make stuff and create messes and get my hands good and inky and glittery and paint-covered and ... well - you get the picture.

I got a lot of the wonderful Sandra Evertson Relics & Artifacts Casts and couldn't wait to do something with them. I decided to combine them with the wonderful new chipboard die cut reliquary blanks from Alpha Stamps.


If you would prefer, you can also get beautiful effects using Tim Holtz Alcohol Inks and layering Ice Resin on top of them.

When the top of the reliquaries are dry, glue to the backgrounds.


Finally, use one of the chipboard diecuts from the top of the reliquary and coat it with black gesso. Using the Lumiere True Gold, paint a thin border around the edge, and affix under the center reliquary. Attach another piece of costume jewelry in the center (I used a copper fleur de lis with a little gesso rubbed into the crevices).

-->
~ Supply List ~
3 Miniature Reliquary
Blanks (I used three of the same frame, requiring three of the kits – but you
could easily use three different ones and only use one kit)
3 Artist and Relics
Figure Heads (I used two of the smaller
and one medium sized)
Creative PaperClay
Silicone Mold –
Ornaments and Settings (this is not the exact mold I used, but will work
perfectly!)
Black Gesso
Pebeo Vitrail
Pebeo Vitrail
Lightening Medium
Pebeo Fantasy Moon
Pebeo Glitter Medium
(Instead of Pebeo
Paints, Alcohol Inks can be used with a top coating of Ice Resin to create the
glossy finish and depth the Pebeo paints achieve)
Prima Art Alchemy
Acrylic Paint Opal Magic Blue-Gold
Jacquard Lumiere
Light Body Acrylic 550 True Gold
Gilder’s Paste – Inca
Gold
3 Sets of Dresden
Scrap Wings – I used two sets small and 1 set medium, but all one size would
work nicely as well.
Mesh Rhinestone
Ribbon
Short piece of
Dresden Gold Border (to use as crown on middle figurehead)
1 small veneer die
cut
1 large chipboard die
cut
1 thrift shop picture
frame (I used an 8” x 10”)
length of vintage
wire metallic ribbon
several small
black mulberry flowers and leaves
some
discarded/broken/mismatched costume jewelry pieces
a piece of vintage
fabric large enough to cover the back of the frame (I used a silk drapery
fabric)
Length of rolled
trim, piping, thick lace, etc. to edge the backing inside the frame.
HAVE FUN!

After finishing up my reliquary figureheads, I realized that it was getting on towards Halloween time - and I really should do something new for the sideboard. I decided to try something a little different from my usual Victorian style witches and potions display and created a little homage to Edgar Allen Poe.

There are four separate pieces, each created from an Alpha Stamps die cut chipboard blank.


Using sturdy black chipboard, cut two sides for the tomb so that it will stand freely on its own. Using matte Gel Medium, cover the tomb with text. I used several pages from an old anthology of Poe's work. Ink the edges of the tomb and then top with a layer of vintage Gel Medium, which will give you a nice aged patina look.
Using a sponge, dab Tim Holtz Metallic Distress Paint Tarnished Brass onto the top sections of the columns, the fence, the door trim and the round window trim. When completely dry, dab first Tim Holtz Distress Paint Peeled Paint, leaving tarnished brass showing through in places. When dry, dab again with the sponge Tim Holtz Distress Paint Crushed Olive, leaving areas of tarnished brass visible.
Using the black chipboard, cut a 1 1/4" wide strip the width of your tomb. Adhere over the door with strong glue as a balcony. Use two Rectangular White Shelf Brackets painted with black gesso on either end to help support the balcony.
Create a small chipboard 'box cover' 4" x 8" and cover with paper from the Bo Bunny "Wickedly Wonderful Collection" paper pad.
Decorate the front of the tomb and door with images from Romantic Victorian Halloween Women Collage Sheet and Night Terrors Collage Sheet.
Affix the door trim to the tomb, trim the fence length in half horizontally and glue to balcony, using Small Gold Hinges with Screws, adhere door to frame.
Glue tomb to 'box cover.' Glue column tops to backings and affix to balcony and front of 'box cover.' Glue window trim around window.
Using an 18mm Glass Cabachon, color with Aqua Tim Holtz Alcohol Ink and glue to a small piece of acrylic (I used a piece of the packaging from a supply). Center and glue in place from the back of the tomb.
Using Tim Holtz Alcohol Inks Mixer Copper, apply to Gold Baroque Dresden Borders. Glue strip to bottom of balcony and across bottom of 'box cover.'
Glue Creepy Tree die cut onto reverse of tomb. Glue a ghostly image of a bridge onto the balcony. I used a die cut scroll sign and painted it with the same patina combination as the columns. I layered on a facsimile of Edgar Allen Poe's signature and topped it with a silhouette die cut of a raven.
If you would like to add the Cask of Amontillado images to the side, they are found on the Poe Story Elements Collage Sheet.

I used Prima Blooming Spray Mists in Empress Gold, Plum and Scarlet to color the tree.
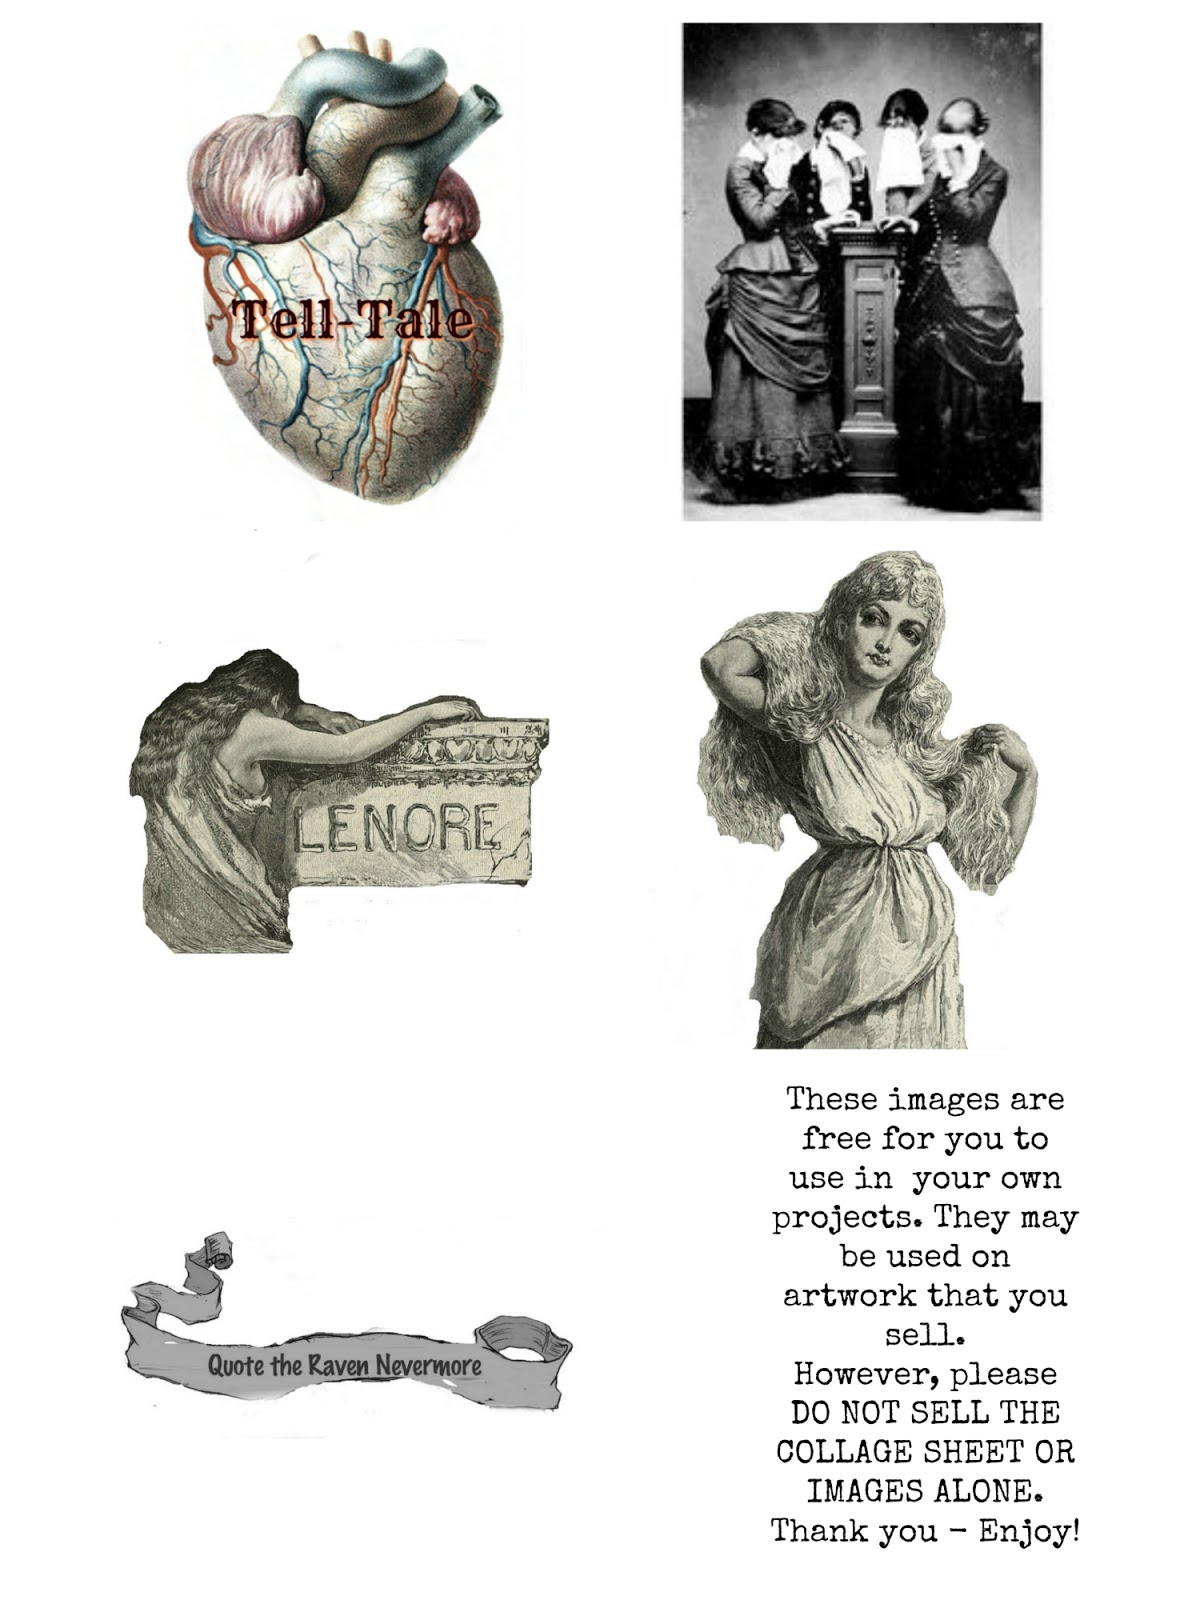
I then created a "bloom" of a heart with the words 'Tell-Tale' on it and glued several onto the tree.
If you would like to recreate this tree, I have included a free collage sheet at the end of this post which you are welcome to copy and use - you will need to resize each of the images for each project section.
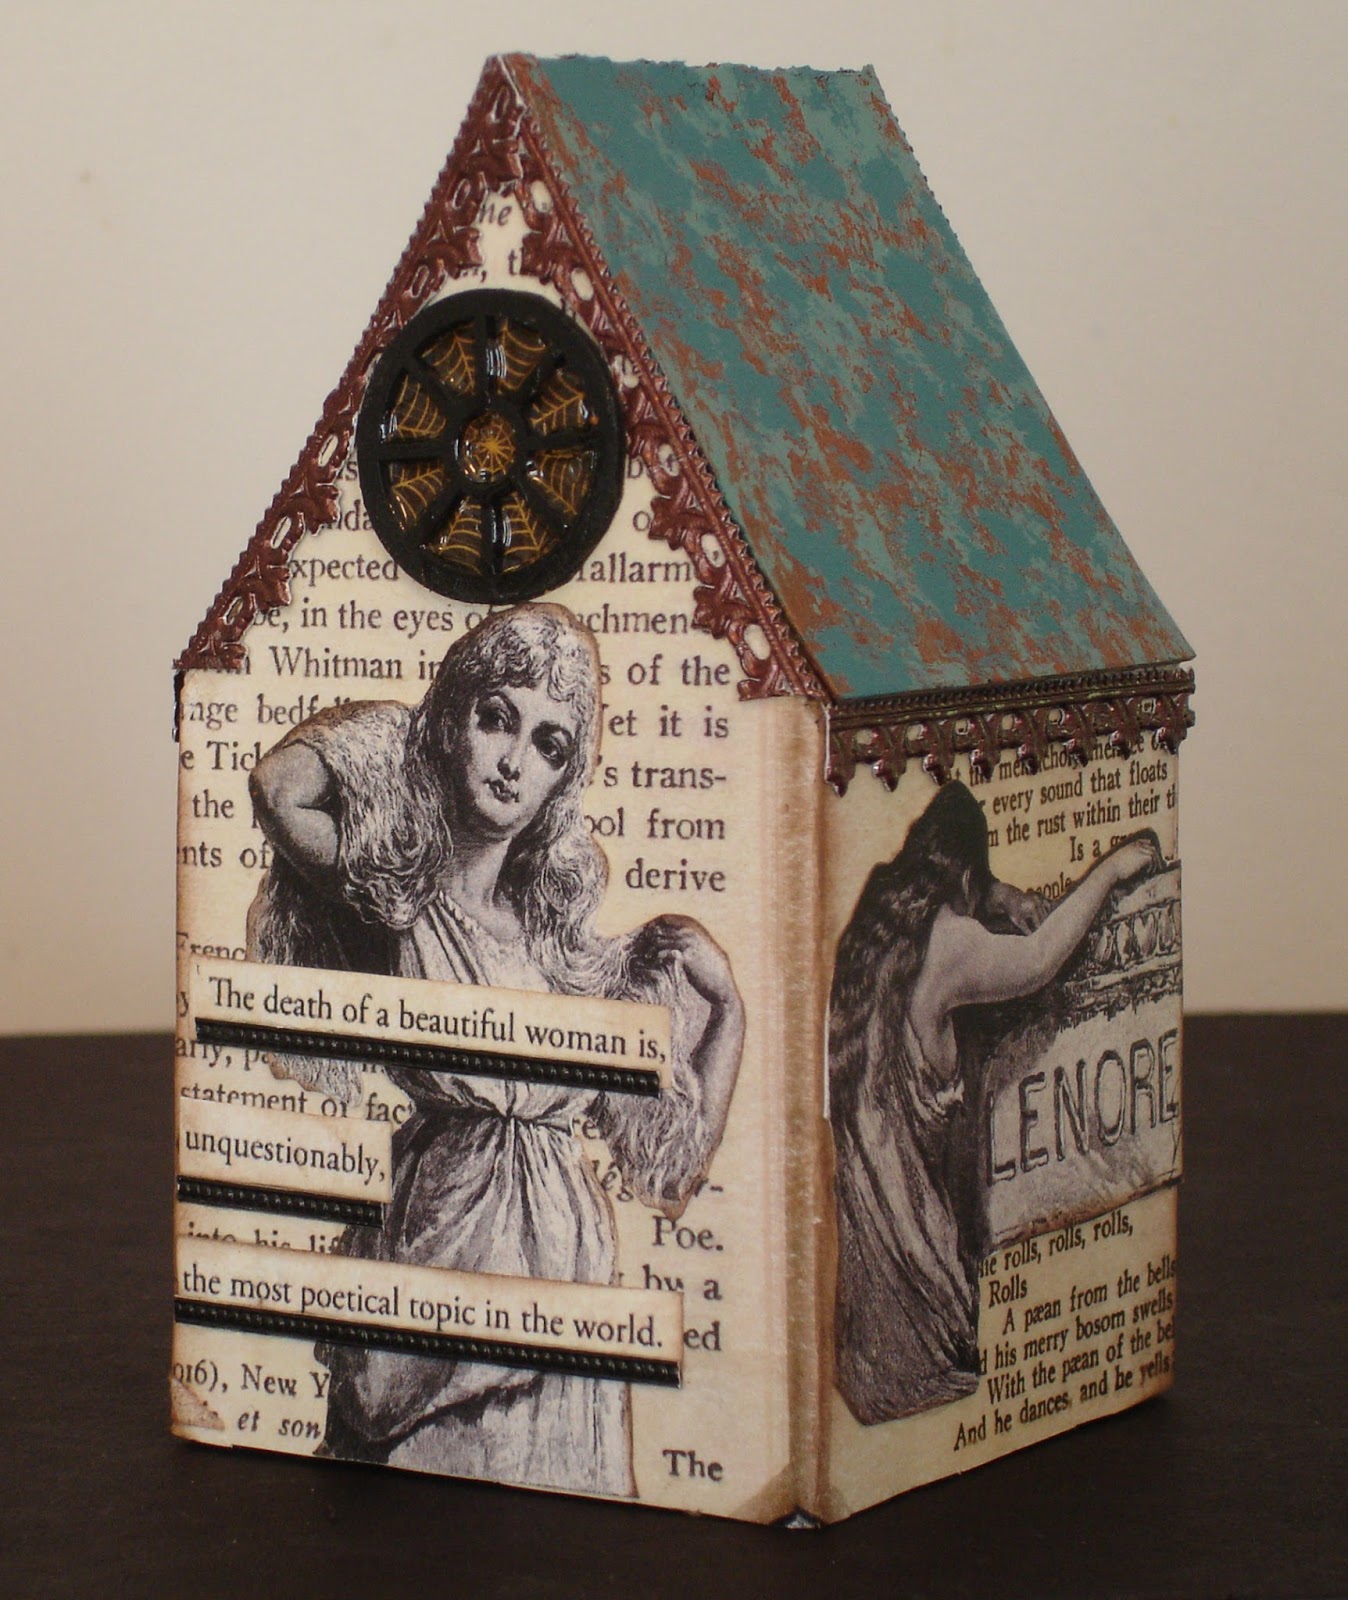
Cover the house with the same text you used on the tomb, adhering with the gel medium and top coating with the vintage gel medium.
You will find the images for the two women on my free collage sheet at the end of this post. Resize to fit the house.
The text 'The death of a beautiful woman is, unquestionably, the most poetical topic in the world,' is from the Poe's Words Collage Sheet. I underlined it with Tiny Dot Black Dresden Borders.
Using the same Dresden and Alcohol Ink that was used on the tomb, color the Dresden border and line the roof edges with it.
The window is made from the spoke window in the Decorative Window Set 1:24 die cuts. It has been coated with black gesso, backed with a piece of spider web paper from the "Wonderfully Wicked Collection" paper pad, and Glossy Accents filled in the openings to simulate glass.

Using some of the Crushed Olive Distress Paint, put some on the Fancy Leaf Header Filigree and then wipe it off so that it remains in the crevices.
Glue the top portion of the reliquary to the backing, and affix the figurehead and the leaf filigree. Place a piece of the alcohol inked gold Dresden border to the bottom of the photo.
Make 'rivets' with Ranger Rose Gold Liquid Pearls around the edge of the reliquary.
Glue a small black silk ribbon under the figurehead.
Here is the supply list for all the different pieces of the vignette (everything available from Alpha Stamps is highlighted and linked in the directions above):
-->
Die Cuts
Gothic Arch Tomb
Mini Wrought Iron
Fence
Raven from Creepy
Critters Shape Set
Column Set Medium
Cabana Row House
(shortest squat house in set)
5” Creepy Tree (2)
Spoke Window from
Decorative Windows Set 1:24
Arch Reliquary from
Miniature Reliquaries Kit
Collage Sheets
“Just Poe”
“Poe Text”
“Poe Story Elements”
“Romantic Victorian
Halloween Ladies”
Paints, Adhesives, Inks
Ranger Glossy Accents
Ranger Alcohol Inks (Mixative Copper)
Ranger Alcohol
Inks - Aqua
Ranger Distressed
Paint (Antiqued Bronze, Peeled Paint,
Crushed Olive)
Ranger Liquid
Pearls (Rose Gold)
Tim Holtz Distress
Medium (Matte, Crazing)
Scor-Tape – ¼”
Assorted Other
18mm Cabechon
Fancy Leaf Header Filigree
Small Gold Hinges
with Screws
Baroque Dresden
Borders Gold
Relic & Artifacts
Casts: Figureheads
Assorted 6” x 6”
papers from Bo Bunny pad “Wonderfully Wicked Collection”
If you would like to recreate these pieces, you are welcome to click on the image below to get a large resolution image of my collage sheet which you are free to use on your projects. Enjoy!
Thanks for spending some time with me here today ... I have another fun little project coming up in a few days. And, then, a really special guest author posting, which promises to be great fun!
Now, go make something beautiful!
¸.•´¸.•*´¨) ¸.•*´¨)(¸.•´
(¸.•´♥ Tristan ♥


5 comments:
Incredibly prolific art! Fantastic array of truly spooky and inspired creations. Thanks for sharing with us.
I can't decide which of these fantastic projects I love the most! I know I want to reread how you made the little gold angel heads. I definitely need to try something like that. I also love how your tell-tale tree is a similar concept to my skull tree!
Why oh why can't we live in the same part of the country so we can craft together?
Great scene,Tristan. My favourite is the tree with the hearts.
Well you have been a busy boy. You used so many cool techniques and products to create your Reliquaries. Inca Gold Gilder's Paste makes the world a better place. Love the sparkle and the lovely ribbon you used at the top. Great idea to mount them in a frame. Oh and Poe - wheeee Look at you rocking goth! I think the hearts in the tree are my favorite and what a clever idea. Also loving how you made the widow's walk at the top with the bride. Is the statue of the image in the back just a backdrop for the photo or is it part of the scene? Either way I love the look, the juxtaposition of the large and the miniature.
Wow! Your pieces are fantastic. I absolutely love all the details and textures. Thanks for sharing!
Post a Comment