So this month when my design team kit arrived, I was excited to find these little ATC shrine boxes, especially designed to hold Artist Trading Cards (which are ALWAYS 2 1/2" x 3 1/2" - the only "rules!").
Then I created an ATC to use in the shrine:
Then I used the Gold Leaf Adhesive Pen with Gold Leaf for the edges of the shrine, a piece of gold zig zag Dresden border inked with Mermaid alcohol ink, miniature blue rose buds, and pieces of the Leafy Corners chipboard set
I added Peacock Liquid Pearls and a Round Word Charm. All are from Alpha Stamps. I finished up with a crown die cut from my stash, cut a die cut chipboard frame in half from my stash (sprinkled with micro beads colored with alcohol ink from Alpha Stamps) and glued them to my finished piece.
Now I thought the ATC was properly showcased!
Just as I was getting started on the second piece, I got a phone call from a friend who wanted suggestions for her wedding's bridal party's place setting favors. I mentioned what she I was in the middle of doing right now and asked what her theme was...well, it seems that she's getting married at Christmastime and her theme is Enchanted Winter Wonderland. Sound pretty, huh?! I told her to give me two days, and I'd come up with an idea (I didn't mention I was also going to fulfill my design team obligation!).
First I had to create the base of the shrine: the ATC:
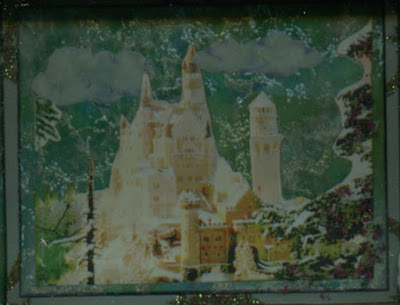
I used alcohol inks and embossing powders to create the background, used and image from the "Castles in the Air" collage sheet, and painted in the clouds myself. I decided it looked wintry enough. Hard to remember when it's 90 degrees outside!
Then I chose to use the shrine kit "ATC Shrine Box"
decorative dots on the insert. It was getting more enchanted! I used the middle sized bottle brush tree from the Retro Bottle Brush Tree Set (shaving some of the back branches so it would fit totally into the box flush with the back...also Flower Soft was added to the tree image on the right side for texture. I also added a pair of wings from the Butterflies Decoupage Paper (I love this paper!) to a vintage plastic bride from my stash. I assembled all the various elements, added Silver Cups turned upside down to use as feet and ribbons and bead flowers and millinery flowers buds to the top to finish it up.
My friend was thrilled with it - and asked if I cold make 9 of them - and somehow turn them into placecards.
I'll let you know how that turns out LOL.
If you'd like to try these projects yourself, here is the complete Alpha Stamps supply list: just click here for all the materials and information on each.
Now...go make something beautiful!
¸.•´¸.•*´¨) ¸.•*´¨)(¸.•´
(¸.•´♥ Tristan ♥


7 comments:
Really very spectacular Tristan!
A fabulous tutorial and I am definitely trying some of these!
Thank you!!!
LOVE your work! You are so creative and talented.
Beautiful work as always Tristan.
Ah........everything, everything here including that ballerina from the red shoes speaks to the child, the teen and the woman in me. TRISTAN, HELLO!!!!!!
Thank you for coming to my blog post. It's always wonderful to see you! HUGS! Anita
gorgeous and inspiring pieces! xo
That little vintage bride is a treasure!
Post a Comment